- If you encounter the same problem on your computer, don’t worry.
- Follow these tips to find simple solutions for your computer.
- Sometimes the error can be simply related to account permissions.
- Sometimes this problem can be caused by a recent Windows 10 update.
A recent Windows 10 upgrade could be to blame for your folder constantly reverting to read-only. A number of users have reported experiencing this error after upgrading to Windows 10. Read-only attributes are used to restrict the ability to read or edit files or folders to a particular group. This can be incredibly frustrating, but there is an easy fix to the problem, which varies with the circumstances that caused it.
Why Are My Files Read-only
Read-only files are usually not meant for alterations or to be modified lightly.
Attributes Read Only
When present, the readonly attribute renders the control immutable, meaning that it cannot be edited by the user.
Usually you can reset the read-only status of a particular folder/file if you want to protect the integrity of the file/folder. This is a problem some Windows 10 users are experiencing.
According to these users, the problematic folder automatically reverts to read-only status, making it impossible to change it. If you encounter the same problem on your computer, don’t worry. Follow these tips to find simple solutions for your computer. Although it’s mostly a problem of insufficient permissions, sometimes this problem can be caused by a recent Windows 10 update.
What causes folders to always be reset to read-only mode?

Read Only Files And How To Change Them
When you wish to change the permissions of a file or folder, click “Share” and then “Advanced Security.” In File Explorer, the Share tab is located at the top. After you open the Share tab, you see the Advanced Security button.
There are folders and files that are set to read-only mode to protect the integrity of the files. The problem folder in this case is set to read-only mode, making editing it impossible.
- Account permissions: Sometimes the error can be simply related to account permissions. This is a common thing, and we don’t realize it.
- Windows Upgrade: If we recently upgraded to Windows 10, the account permissions may have been changed. This leads to this error.
How to fix the “Folder Keeps Reverting to Read Only” error?
We highly recommend that you use this tool for your error. Furthermore, this tool detects and removes common computer errors, protects you from loss of files, malware, and hardware failures, and optimizes your device for maximum performance. This software will help you fix your PC problems and prevent others from happening again:
Updated: May 2024

Why Is My File Read-only
You can change the read-only status of files and folders copied from optical discs, but you have to copy the files from the optical disc first.

Log in as an administrator
- Click the Run as administrator button in the search results after finding Command Prompt in the search bar.
- Enter the following command in the Command Prompt window:
/active: Yes, I am an administrator of a net user - The default administrator account will be assigned to you once the command has been executed successfully.
- Now, check if the folder is read-only after this solution was applied in Windows 10.
It is recommended that you log in as both an administrator and guest on your computer in order to be able to access any files or folders on your computer.
Changing the disk permissions
- To make a file or folder read-only, right-click it and select Properties.
- On the Security tab, click Edit and then select the username.
- Click on the Full Control checkbox in the Permissions window titled Permissions for (folder name). The specified file and folder will be granted permission to view, edit, and write.
- The settings will be saved when you click OK.
Performing SFC and DSIM scans
- Running as an administrator requires you to locate the command line.
- Enter sfc /scannow into the command line window and press Enter to run the SFC command.
- As described in the next step, run the DISM scan after the scan has been completed.
- To execute these commands, copy and paste each of them into the command line, press Enter each time:
- Cleaning up the image / scanning the health / DISM.exe /online /
- Cleaning up the image /Restoring health (DISM.exe)
- Cleanup-image / Start component cleanup using DISM.exe
DSIM and SFC scans should be run if you suspect your system has corrupted files.
Disable supervised file access
- In the search bar, type in “Windows Security”. Press the “Open” button.
- You can find this section under Virus and Threat Protection on the left side of the screen.
- The Virus and Threat Protection Settings will appear once you select Manage Settings on the right side of the screen.
- The Manage Controlled Folder Access button can be found under the Controlled Folder Access section.
- You can turn off access here.
- Your computer needs to be restarted.
- You should be able to open and edit the folder you tried earlier.
RECOMMENATION: Click here for help with Windows errors.
Frequently Asked Questions
How do I restore a write-protected folder?
- Right-click the file or folder icon.
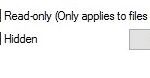
- Uncheck the Read-only box in the File Properties dialog box. The attributes are at the bottom of the General tab.
- Click OK.
How do I fix a folder reset to read-only mode?
The easiest solution is to change the permissions. In most cases, a few changes to the permissions will make the folder read-only. You can also log in as an administrator or change the attribute of the folder.
How do I disable the read-only folder in Windows 10?
- Right-click the folder and select Properties.
- Click the Security tab, then click Advanced.
- Click Edit to the right of Owner.
- Enter user in the field, then click OK.
- Select the Replace owner on sub containers and objects check box, then click Apply.
How can I permanently disable write protection?
- In File Explorer, right-click OneDrive and select Properties.
- On the General tab, under Attributes, uncheck the Read-only box and click OK.
- You will be asked if you want to apply the changes to all folders, subfolders, and files. Click OK.

Mark Ginter is a tech blogger with a passion for all things gadgets and gizmos. A self-proclaimed "geek", Mark has been blogging about technology for over 15 years. His blog, techquack.com, covers a wide range of topics including new product releases, industry news, and tips and tricks for getting the most out of your devices. If you're looking for someone who can keep you up-to-date with all the latest tech news and developments, then be sure to follow him over at Microsoft.