- Microsoft has replaced its classic screenshot plotter and combined its features with Snip & Sketch.
- Windows 11 is a simple modification of Windows 10, but it’s full of bugs.
- I will explain what causes them and what you need to do to make the app work properly.
- The Snipping tool may not be available in Windows 11 mainly for the following reasons: Outdated graphics driver and incorrect installation of the clipping tool may cause the tool to fail.
- Download and install the software.
- It will scan your computer to find problems.
- The tool will then correct the issues that were discovered.
Have you recently upgraded to Windows 11 and found that the Snipping tool is missing from your Windows 11 computer? If so, you’ve come to the right place. In this guide, you will find a list of effective solutions to help you solve the problem of the missing Snipping tool in Windows 11. Microsoft has replaced its classic screenshot plotter and combined its features with Snip & Sketch. The new Windows 11 app looks like a simple modification of Windows 10, but it’s full of bugs. I will explain what causes them and what you need to do to make the app work properly.
What is a Snipping Tool in Windows 11?
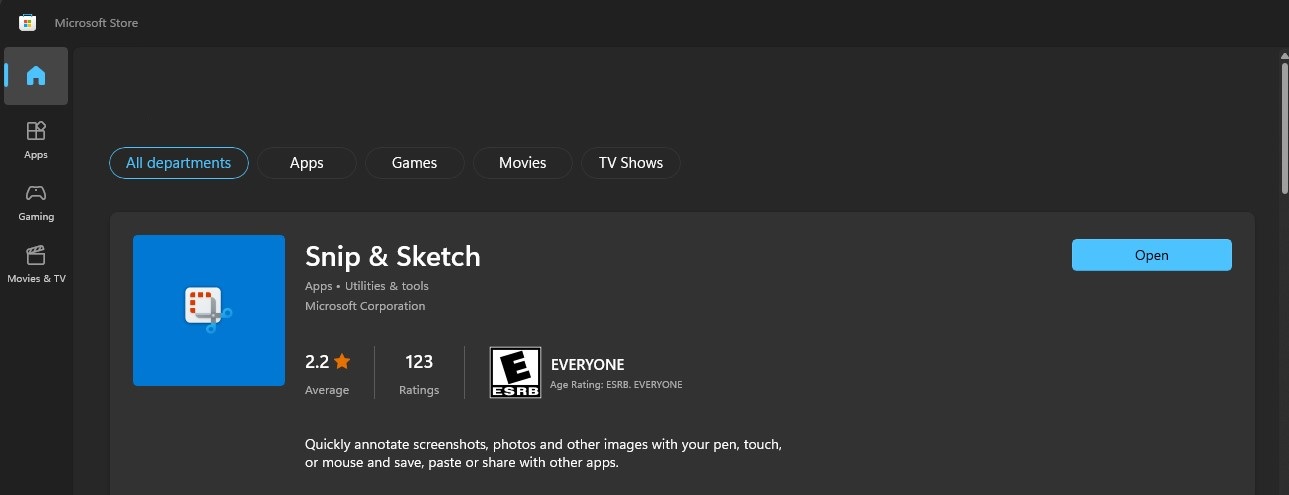
A classic screen capture tool first introduced in Windows Vista, the Snipping Tool is a screenshot tool that is used by many Windows users today. Prior to Windows 10, it was the default screenshot tool, but since Windows 11, this has all changed with Snip & Sketch. In spite of the fact that Snip and Sketch appear to be a simple replacement, there are still drawbacks and some people prefer Snipping.
This guide explains how to fix five issues with Windows Snipping Tool.
The print screen button on my computer does not work despite my repeated attempts to wait. I have been using Windows 10 for a couple of years now. Please let me know if you have any tips for how to fix this problem. I’ve been using it for a while now.
[ATTACH]The Snipping Tool is on the list of features removed in Windows 11. Discuss and support the problem How to restore old Snipping Tool in Windows 11 in Windows 10 News; [ATTACH] The Snipping Tool is on the list of Features Removed in Windows 11. In ‘Windows 10 News’, WinClub first started discussing the problem…
Reasons the Snipping Tool is missing
Due to the following reasons, Windows 11 may not include the Snipping tool:
- Outdated graphics driver: If the system’s graphics driver is outdated, its incompatibility with the Snipping tool may cause the Snipping tool to fail.
- Interference from other applications: If another application or process on the system interferes with the cut tool, it can cause a cut tool problem.
- Incorrect installation of the clipping tool: The clipping tool may not work if its installation is corrupted (for example, due to a bug in the Windows 11 update process).
The clipping tool does not work in Windows 11 due to these reasons. Let’s see how to fix it.
How to fix the missing Snipping Tool in Windows 11?
Check for new updates
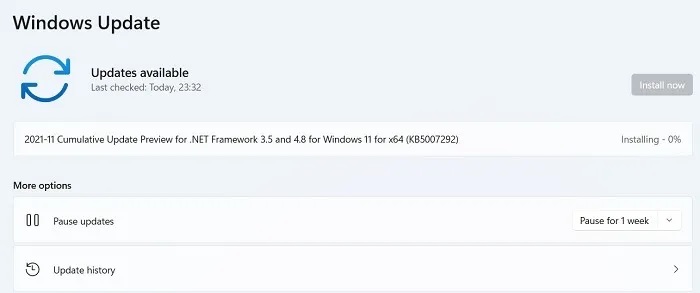
Updates can be checked and installed more quickly with Windows 11.
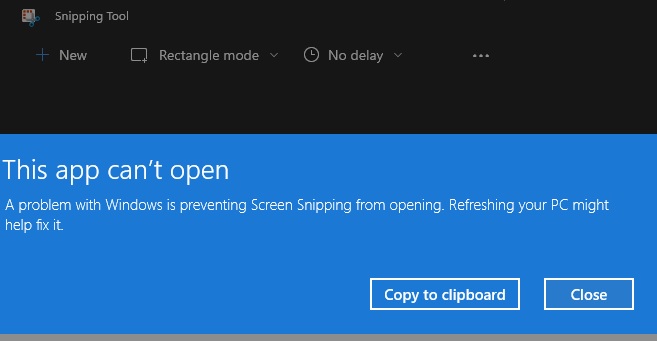
If you recently upgraded to Windows 11, you will notice that old Snipping Tool is missing or not working. Windows 11 replaced the old Snipping Tool with combined Snip & Sketch and Snipping Tool. The new tool doesn’t have an app that can be launched from the Start Menu, and instead has a setting that lets you use the Print Screen button to open Screen Snipping. There are a number of users that feel like the new tool doesn’t offer as much functionality as the old tool, myself included. Fortunately, there’s a way you can get the benefits of both apps. Some users are also getting a “This app can’t open” error when trying to open the new Snipping Tool in Windows 11.
- The “Update & Security” section can be accessed by opening the Settings app.
- It will automatically download and install any available updates if they exist. If they do, click the “Check for Updates” button.
- The “Install Now” option also lets you manually install them.
- If any pending updates are present, you may need to restart your computer manually to complete the update process. Windows usually restarts automatically after the updates have been installed.
In case anything goes wrong with your Windows 11 installation, you should always back up your data before installing any updates.
Updated: April 2024
We highly recommend that you use this tool for your error. Furthermore, this tool detects and removes common computer errors, protects you from loss of files, malware, and hardware failures, and optimizes your device for maximum performance. This software will help you fix your PC problems and prevent others from happening again:
- Step 1 : Install PC Repair & Optimizer Tool (Windows 10, 8, 7, XP, Vista).
- Step 2 : Click Start Scan to find out what issues are causing PC problems.
- Step 3 : Click on Repair All to correct all issues.

Restore corrupted system files
SFC can repair corrupted system files in Windows 11 using a variety of options. Here’s how to use it:
- Select Command Prompt (Admin) from the Power User menu by pressing Windows key + X.
- Scan and replace any corrupted files by typing the following command after pressing Enter: sfc /scannow.
- The issue should be resolved once the scan has been completed. If it hasn’t, restart your computer and check.
In the Recovery Console, you can also run the DISM tool if you still have corrupt system files.
The final option is to uninstall and reinstall Snip & Sketch.
Set the time automatically
Following these steps can help you set the time automatically on Windows 11.
Snipping Tool Is Not Working
The issue can be resolved by exiting and restarting Snipping Tool. Alternatively, you can access the Task Manager by pressing the keyboard shortcut “Ctrl + Shift + Esc”. Locate and exit SnippingTool.exe, then relaunch it.
- Choosing the cog icon on top of the Start screen will bring up the Settings app.
- You can next select Date & Time from the sidebar by clicking on Time & Language.
- Choose your current time zone from the drop-down menu after you toggle the Set time automatically toggle on.
- You can now automatically set the clock on your computer by clicking the Save button.
Please refer to your computer’s manual or contact customer support if you have any further questions about setting the time automatically on Windows 11.
Reinstall the Snipping Tool
Taking screenshots is made easy with the Snipping Tool, which is included with Windows. Here’s how to reinstall it if you’ve accidentally uninstalled it.
- Run Windows PowerShell by right-clicking on its result and selecting “Run as administrator” from the Start menu.
- The new app packages will be registered when you run the following command: Add-AppxPackage -Register -DisableDevelopmentMode -Verbose After entering this command, the app packages will be re-registered.
- If the app isn’t available, try restarting your computer or opening the Start menu again.
Check your computer for viruses
You can protect yourself against malware with the built-in antivirus in Windows 11.
- Simply click on “Scan now” in the Windows Defender Security Center to take advantage of this feature.
- In the next step, you’ll be asked whether you want to run a full or quick scan, which only checks your active threats.
- It may take a few minutes for the scanning process to be completed after you have selected a scan option.
- An analysis of any threats found in the scan will be provided once the scanning has been completed.
- You can remove viruses from your computer by clicking on the “Cleanup” button. This is usually effective in removing viruses without damaging your files.
RECOMMENATION: Click here for help with Windows errors.
Frequently Asked Questions
How can I restore the snipping tool on Windows 11?
If you've accidentally uninstalled the Snipping Tool or can't find it, you can reinstall it by following these steps:
- Open the Start menu and type "Windows PowerShell." Right-click on the result and select "Run as administrator."
- Type the following command and press Enter: Add-AppxPackage -Register -DisableDevelopmentMode -Verbose
- Open the Start menu again and type "Snipping Tool." The app should now be available. If it's not, restart your computer.
Why is there no Snipping Tool in Windows 11?
Microsoft has replaced this tool with Snip & Sketch. Although at first glance a simple replacement, Snip & Sketch has its drawbacks, and people still prefer the Snipping tool because it can still be used. Many users report that the Snipping tool does not work.
Why has Snipping Tool disappeared in Windows 11?
The reason there is no Snipping Tool in Windows 11 is that Microsoft decided to merge the old Snip & Sketch and the Snipping Tool into one application, also called the Snipping Tool. This article details how to fix the absence of the Snipping Tool in various ways.

Mark Ginter is a tech blogger with a passion for all things gadgets and gizmos. A self-proclaimed "geek", Mark has been blogging about technology for over 15 years. His blog, techquack.com, covers a wide range of topics including new product releases, industry news, and tips and tricks for getting the most out of your devices. If you're looking for someone who can keep you up-to-date with all the latest tech news and developments, then be sure to follow him over at Microsoft.
Related posts:
 Retrieve Windows error code 48 – “The software on this device has been blocked at startup because it is known to have problems with Windows”
 Fixing Microsoft Store error 0x80131505
 Solve the problem of Windows 10 brightness control not working
 Troubleshooting: Installation Error Code 0x80072f76 – 0x20016 on Windows 10