- Virtualization is a useful feature present on almost all modern computers.
- It allows you to create additional virtual environments that run on your computer’s real hardware.
- Sometimes virtualization doesn’t work properly.
Virtualbox Hardware Acceleration
On a Linux host, I have 3D Acceleration enabled with a Windows 10 guest. I am having the following problems:
The host no longer has access to the device if you PCI passthrough it.
It’s easy to test different operating systems, run older applications, or use different operating systems with virtualization on your computer, a handy feature found in almost all modern computers.
Using this post, you will be able to enable hardware virtualization in your BIOS or UEFI.
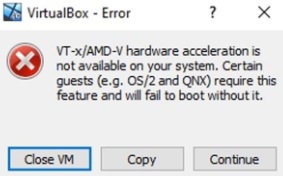
There are two main features needed to run or install a Virtual Machine, VT-x/AMD-V and Enable Nested Paging. This error clearly indicates that your system does not support hardware acceleration. In order to enable these options, you have to enable Hardware Virtualization in your system BIOS. You will see that the Acceleration tab is greyed out in VM VirtualBox if you open the program. The fix to this issue is to enable virtualization Intel VT-x or AMD-V in your BIOS or UEFI Firmware.
The following steps can help you fix the issue if virtualization fails to work properly on your system as a result of issues like “VT-x hardware acceleration not installed” or a similar error message.
What causes this error message?

- The BIOS disables VT-x/AMD-V.
- With Hyper-V, AMD-V and VT-x are disabled
- There is no support for AMD-V / VT-x on your processor.
How to resolve the issue?
We highly recommend that you use this tool for your error. Furthermore, this tool detects and removes common computer errors, protects you from loss of files, malware, and hardware failures, and optimizes your device for maximum performance. This software will help you fix your PC problems and prevent others from happening again:
Updated: April 2024

For VirtualBox 4.0, the Enable VT-x/AMD-V button is not available; however, you can run the following command before installing: VBoxSDL –startvm minix –norawr0 –norawr3
If you want to know what your CPU is capable of, you should ALWAYS check the Intel Processor Documentation website at ARK.INTEL.COM. In this case, the Intel E5300 is not capable of running Virtualization. This link explains why:
Activate Intel-AMD virtualization on the virtual machine by selecting the virtual machine in VirtualBox and clicking on Settings.
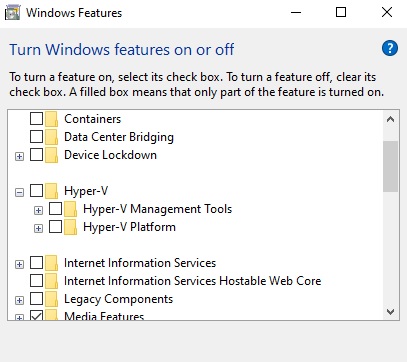
Turn off Hyper-V
- The Run dialog box will appear when you press Win + R. Type OptionalFeatures.exe into it.
- The Hyper-V option in Windows Features should be unchecked if enabled.
- Your changes will be saved when you click OK.
- Choose Run as administrator from the menu when you right-click Command Prompt and type cmd in the search box.
- The following command should be entered at the extended command prompt.
Hypervisor launch type should be set to off using bcdedit - You can find the following path in the left navigation pane of the Local Group Policy Editor window by running the gpedit.MSC command
- Activate Device Guard under System Settings – Admin Templates – System.
- Save your changes by clicking OK after you double-click the Enable virtualization-based security option.
Perform an SFC scan
- Open the advanced command line again, type the command sfc /scannow and press Enter.
- Once the corrupted files have been scanned and restored, you can exit the program.
- Be sure to complete this process in a timely manner.
Enable VT-x/AMD-V in the BIOS
- The BIOS can be accessed whenever the home screen appears by pressing Delete or F2.
- To enable Intel Virtualization Technology, go to the Advanced tab and click the Enabled button.
- If you press F10, your changes will be saved and you will be prompted to reboot your computer to apply them.
RECOMMENATION: Click here for help with Windows errors.
Frequently Asked Questions
How do I enable AMD VT-x hardware acceleration?
Press the F2 key when starting the BIOS setup. Press the right arrow key to go to the Advanced tab, select Virtualization Technology and press Enter. Select Enabled and press Enter. Press F10, select Yes and press Enter to save your changes and restart Windows.
How do I fix Vt X not being available?
- Disable Hyper-V virtualization.
- Enable nested virtualization in the Avast configuration menu.
- Disable Windows Defender kernel isolation.
- Enable VT-X in your BIOS settings.
Why is hardware acceleration not available?
The error is due to the fact that virtualization is disabled in your BIOS settings. Although virtualization is enabled by default on most computer configurations, this error is quite common.

Mark Ginter is a tech blogger with a passion for all things gadgets and gizmos. A self-proclaimed "geek", Mark has been blogging about technology for over 15 years. His blog, techquack.com, covers a wide range of topics including new product releases, industry news, and tips and tricks for getting the most out of your devices. If you're looking for someone who can keep you up-to-date with all the latest tech news and developments, then be sure to follow him over at Microsoft.