- The “Powershell no longer works” error is caused by a virus (Poweliks) on your computer.
- It is likely that your computer is currently running very slowly.
- Windows PowerShell errors in Windows 10 do not occur often.
- There is no more detailed information about what caused the problem.
- If you are using Windows 7 or Windows 10, use the Uninstall update KB3163245 to remove the update.
If there are any errors or information that needs to be added, please edit this document.
Follow this guide to remove the Powershell has stopped working error message.
The “PowerShell no longer works” error message appears rarely in Windows 10. Therefore, if you see it, try some effective methods to resolve it.
When you run a security scan, antivirus software will automatically remove the malware that caused the Windows Powershell has stopped working error.
The PowerShell is not recognized message is another indication of a system corruption issue, but fortunately, it can be fixed.
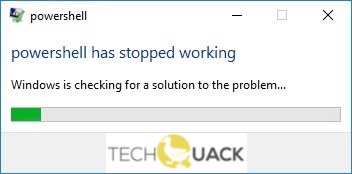
You can find out why the Powershell has stopped working error occurs on your Windows 10 computer by looking at the following paragraphs. The error means something has stopped the running process on your computer, but no further details are provided. The following paragraphs will tell you how to fix the Windows 10 Powershell has stopped working error.
You won’t be able to find out why Powershell doesn’t work on your Windows 10 computer, but something stopped it from running.
What causes the “Powershell no longer running” problem?

Powershell Has Stopped Working
Using this command, you can open the PowerShell default location, copy paste the Download files into it, and you’re done!
Powershell Repair
It is not official, but here is how you can fix PowerShell in Windows 10:
You may be experiencing very slow computer performance because of a virus (Poweliks).
How do I resolve the ‘Powershell has stopped working’ error?
We highly recommend that you use this tool for your error. Furthermore, this tool detects and removes common computer errors, protects you from loss of files, malware, and hardware failures, and optimizes your device for maximum performance. This software will help you fix your PC problems and prevent others from happening again:
Updated: April 2024

Licensed versions of Reimage Reimage are required to repair damaged systems.

Remove the Microsoft security update KB3163245
- The safe mode can be entered by pressing F8 in Windows 7.
- Afterward, open the program and features section in the Control Panel.
- You can view installed updates by clicking Show Installed Updates in the left nav bar.
- Click on the Uninstall button for update KB3163245.
- Use Windows 10’s Start menu to select Restart while holding down the Shift key.
- Then press the Windows + I keys and select Update and Security.
- When you click Update History, a pop-up window will appear. Click Remove Updates to remove it.
- Select Uninstall from the right-click menu when you have selected the erroneous update.
- Your computer should now be restarted.
Create a new Microsoft account
- The Windows Start icon can be found by clicking on it.
- Then select Accounts from the Settings menu.
- You can also select other users in the Family section.
- Then click the Add a user button.
- Continue this process by following the screen instructions.
Disable and re-enable Windows PowerShell
- Choose Control Panel by pressing Win+X on your keyboard.
- Navigate to the category you wish to edit in the Control Panel.
- Uninstall can be found under Programs in the list that appears.
- The Enable/Disable Windows features menu is found on the main window’s left side.
- The Windows PowerShell entry can be found by scrolling down.
- Turn off PowerShell.
- Ensure that the changes are saved and applied.
- Your Windows 10 computer will need to be restarted.
- Re-enable Windows PowerShell by repeating the above steps.
RECOMMENATION: Click here for help with Windows errors.
Frequently Asked Questions
How do I fix Windows PowerShell?
Press "Windows + X" to open the startup context menu and select "Windows PowerShell (administrator)". Once the command prompt loads, type sfc /scannow and press Enter. The Windows repair program now checks your system files for corruption and automatically replaces any corrupt or missing files.
Why is my Windows PowerShell not working?
The "Powershell no longer works" error is caused by a virus (Poweliks) on your computer. Reboot your computer and press the F8 key several times to open the "Advanced Boot Menu". You need to press the F8 key until the Windows logo appears and several times on the start screen until the "Advanced Boot Menu" appears.
How do I reset Windows PowerShell?
If you know what setting you changed, you can reset it by right-clicking on the top edge of the Powershell or Command Prompt window and select Properties. Find the parameter you want to change. If you are not sure what was changed, click Default Settings.

Mark Ginter is a tech blogger with a passion for all things gadgets and gizmos. A self-proclaimed "geek", Mark has been blogging about technology for over 15 years. His blog, techquack.com, covers a wide range of topics including new product releases, industry news, and tips and tricks for getting the most out of your devices. If you're looking for someone who can keep you up-to-date with all the latest tech news and developments, then be sure to follow him over at Microsoft.
Related posts:
 How to Troubleshoot “The User Profile Service Failed the Logon” Error Message in Windows 10
 How to Repair: “Cannot Currently Check for Updates” Error Message on Windows 7
 How to Resolve: Boot Configuration Data File is Missing in Windows PC
 Correcting the ‘You Must Enable System Protection on This Drive’