- Windows 10 also supports moving installed apps to a different drive.
- This means, for example, if an app was installed on the default “C” drive, it can be moved to “D” or “E” drives without reinstalling and losing data.
There are many reasons for this problem, such as installing the wrong software on your Windows 10 PC, or having a 32-bit operating system and a 64-bit program.
In addition to the ability to change the default installation location of apps in the storage, Windows 10 also supports moving installed apps to a different drive. This means, for example, that if an app was installed on the default “C” drive, it can be moved to “D” or “E” drive without reinstalling and losing data.
By clicking on the app entry under Settings – Apps – Apps and Features, then clicking Move, users can move installed apps.
Initially it seemed to move when I moved from one page to another, but now I can’t move it from one to another. After moving 3/4 of the way, I click Apply.
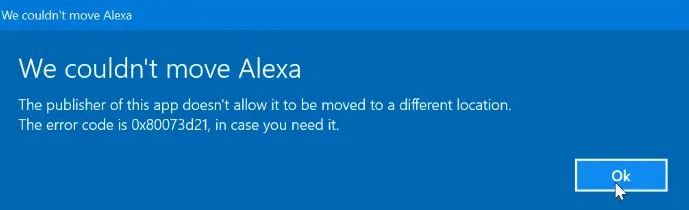
In some cases, when you move an application, you may receive the message, “You cannot move this application.”. If needed, enter error code 0x80073d21.
What causes the error “The editor of this application does not allow you to move it to another location”

There is a problem when clicking on the “Move” button after selecting another drive from the drop-down menu. Many editors don’t allow you to change existing folders.
Although the UI says you can move it, you can’t. However, there is a workaround that can be used, but it’s a bit tedious.
Here’s how to solve the “The editor of this app doesn’t allow you to move it to another location” problem
We highly recommend that you use this tool for your error. Furthermore, this tool detects and removes common computer errors, protects you from loss of files, malware, and hardware failures, and optimizes your device for maximum performance. This software will help you fix your PC problems and prevent others from happening again:
Updated: April 2024

Following this post, you can delete the target app from your Mac thoroughly after fixing the error saying the item can’t be moved to the Trash due to its open status.

Change where new content is stored
- You can find the Apps and Features icon under Settings – > Apps.
- If you delete an application, your PC’s data will be deleted as well.
- Select Settings -> System -> Storage from the list of options.
- New content can be added by clicking the “Edit Content” section.
- The drive where the application you just deleted will appear in a drop-down menu. Select it.
- You will be prompted to launch the Microsoft Store.
- It is important to download and reinstall the remote app to the desired location.
- For future apps, choose Settings – > System – > Storage.
- You can then change the location of your storage by clicking Change Storage Location.
Editing the registry
- The first entry you see in the search results is Regedit – type it in then click it.
- The following key needs to be entered in the Registry field:
- HKCUSoftwareMicrosoftWindowsCurrentVersion.
- Click CurrentVersion twice.
- Look for ProgramFilesDir.
- You can then choose to change the default installation location by double-clicking one of the entries. The C drive should appear at the top of the list when you check the entries.
- After editing is complete, click OK.
- To apply the changes, restart Windows.
Change Settings
- By pressing Windows + I or clicking Settings in the Start menu, you can launch the Settings app.
- You can choose the system you want.
- Choose Storage from the menu on the left.
- Your new applications will be saved on the drive you select under the Storage Places section.
- Click Apply.
- Make sure your system is restarted after closing the Settings application.
- The location you selected will automatically be used to save all new apps from the Windows Store.
RECOMMENATION: Click here for help with Windows errors.

Mark Ginter is a tech blogger with a passion for all things gadgets and gizmos. A self-proclaimed "geek", Mark has been blogging about technology for over 15 years. His blog, techquack.com, covers a wide range of topics including new product releases, industry news, and tips and tricks for getting the most out of your devices. If you're looking for someone who can keep you up-to-date with all the latest tech news and developments, then be sure to follow him over at Microsoft.