- Deployment Image Servicing and Management (DISM) tool is very useful when you need to find and fix corrupt files on your system.
- Sometimes DISM may report error code 1392 and stop scanning.
- This error should be corrected as soon as possible.
- If it is not corrected, it can lead to data loss, system crashes, hardware failure.
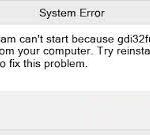
- The full error message is as follows: “Error: 1392.
In order to better understand this error message and how it happens, let’s start by exploring the causes and solutions of Dism.exe 1392.
This error occurs when a temporary file or directory is unreadable or corrupted. It is part of the Dism.exe error 1392.
A Deployment Image Servicing and Management (DISM) tool can help you locate and fix corrupt files. When some files are missing in the system or if data is corrupt or broken, DISM may stop scanning and report error code 1392. If it is not corrected as soon as possible, it can result in data loss, system crashes, and even hardware failure. It is very important to fix this error as soon as possible because if not, it could lead to system crashes, hardware failure, and even data loss.
According to the error message, the following information should be provided:
“Error: 1392.
It is not possible to read the file or directory”.
What causes DISM error 1392?

It is likely that the DISM error 1392 was caused by a corrupted or missing file that would have been fixed by SFC after the computer reboots.
If the message occurs, some system files are corrupt or inaccessible. The reason you ran a scan is likely to have been an unreadable system file. You may experience system-wide problems if the problem isn’t resolved as soon as possible, such as data loss, system crashes, hardware crashes, and sometimes a blue screen.
While the consequences of this error are frightening, the solutions are quite simple. To fix DISM error 1392, try the following methods one by one.
How to repair the DISM 1392 error?
We highly recommend that you use this tool for your error. Furthermore, this tool detects and removes common computer errors, protects you from loss of files, malware, and hardware failures, and optimizes your device for maximum performance. This software will help you fix your PC problems and prevent others from happening again:
Updated: April 2024


Execute a system restore
- Start the program by clicking on it.
- You can find the System Restore option by typing it in the search box.
- You can create a restore point by clicking Create a restore point in the search results.
- Passwords and permissions must be entered for administrator accounts.
- System Restore appears in a new window. Click it.
- Click Next.
- To restore the previous restore point, click the button.
- Click Next.
- Click Exit.
You can restore the system to its original state by following these steps:
- Start by right-clicking.
- You will find the Control Panel there.
- Search for Restore in Control Panel.
- Select Restore.
- During the System Restore process, click the Open button.
- Click Next.
- To resolve the problem with the problematic application/program, driver, or update, select the restore point associated with it.
- Once again, click Next.
- Click Finish.
Executing an SFC scan
You can replace corrupt system files with genuine Microsoft versions if you encounter the error message dism.exe 1392.
- Start the program by clicking on it.
- You can search for CMD by typing it into the search box.
- The command prompt will appear.
- You can run the program as an administrator by right-clicking.
Run the sfc/scannow command. - Enter.
- Once the process has been completed, reboot your computer and see whether the dism.exe 1392 error has been resolved.
Temporary disabling of antivirus software
A good anti-virus program will protect your computer from viruses and other security threats. You shouldn’t disable the software if you want to protect your computer against viruses.
- Located in your taskbar next to the clock is an icon for antivirus security software. Click it to begin the installation process.
- Right-click it.
- You can disable it by selecting the option.
Inspect your computer for malware
Infection with malware can cause dism.exe 1392 errors by corrupting, destroying, or even deleting files related to errors.
If you have a malware problem, run a full scan for it and make sure to use Vipre as your malware protection tool.
RECOMMENATION: Click here for help with Windows errors.
Frequently Asked Questions
How to fix Dism exe error 1392?
- Temporarily disable your antivirus program.
- Run an SFC scan.
- Delete unnecessary files.
- Run a Check disk to check and fix hard disk errors.
- Scan your computer for malware.
- Perform a system restore.
What is the DISM tool window?
The Deployment Image Servicing and Management Tool (DISM) is an administrator-level command-line utility available in Windows that can be used to restore a Windows image or to resize the .vhdx format of the Windows installation media and can be used to troubleshoot problems with the Windows operating system that is currently installed.
Do I have to run DISM or SFC first?
You can usually save time by running only SFC, unless the component memory for the SFC must be restored by DISM first. If you run scannow first, you can quickly determine if there have been integrity violations. If you run the dism command first, scannow usually does not show detected integrity violations.
How to fix DISM error?
- Open Start.
- Find the Command Prompt, right click on the first result and select Run as administrator.
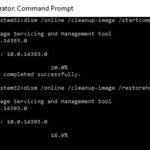
- Enter the following command to restore the Windows 10 image and press Enter: DISM /Online /Cleanup-Image /RestoreHealth.

Mark Ginter is a tech blogger with a passion for all things gadgets and gizmos. A self-proclaimed "geek", Mark has been blogging about technology for over 15 years. His blog, techquack.com, covers a wide range of topics including new product releases, industry news, and tips and tricks for getting the most out of your devices. If you're looking for someone who can keep you up-to-date with all the latest tech news and developments, then be sure to follow him over at Microsoft.