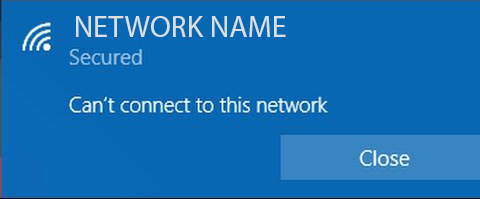
- There are reports of users getting the message “Windows 10 can’t connect to this network” when they try to connect to the Internet.
- There are several ways around the problem and successfully connecting to the network of your choice on your PC.
- To fix connection errors, you need to download the latest drivers for your network adapter.
- Download and install the software.
- It will scan your computer to find problems.
- The tool will then correct the issues that were discovered.
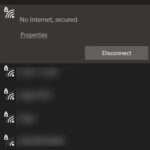
Connected With No Internet
When you encounter a signal issue, restart your modem and router first. Don’t skip this step! A modem and router restart is usually the first thing tech support will suggest.
T Connected
t:connect mobile app and t:slim insulin pump allow you to manage diabetes more easily.
When you try to connect to a network on your Windows computer, you may encounter the error “Windows 10 cannot connect to this network.” The error doesn’t tell you what to do about the problem or what to do about it besides the fact that you can’t connect to the network.
Many users need access to the Internet, but some are experiencing problems connecting to the network when they try to connect with Windows 10.
T:connect
It is intended for residents of the United States (USA) and healthcare professionals to use the t:connect diabetes management application.
Restart your device: Your IT guy will probably recommend that you restart your device as a standard troubleshooting solution. This will probably solve your issue.
You probably don’t know what to do when you are faced with this situation. Fortunately, there are several ways to circumvent it and successfully connect to your chosen network.
It is possible that Techquack will have a hard time solving this problem, but there are several solutions available.
Wifi Connecting
A smart phone on Android can use this app to locate an open WiFi network and connect to it automatically, saving you data and making it easy to jump over open WiFi networks. If you have selected a saved network for the device, the app will not switch networks.
Missing drivers or drivers that are out of date are often the culprit for Windows 10 computers not being able to connect to WiFi. If you were unable connect after trying the above solutions, you can try to manually identify and install the correct drivers for your computer. (Driver Support offers a great tool that automatically scans and installs missing drivers for you, so that you don’t have to spend hours trying to figure it out yourself or accidentally deleting important files that your computer needs to run smoothly. You can Give Driver Support | ONE a try today!)
What causes the “Windows can’t connect to this network” problem?

You can start your PC from scratch by restarting it.
Users surprisingly often encounter issues and bugs that prevent Windows 10 from connecting to their network or the Internet, regardless of the fact that Windows 10 computers, laptops, and tablets are capable of accessing the network and the Internet.
It can happen for a variety of reasons that Windows 10 is unable to connect to the network:
- Wireless SSID/password incorrect
- (Wired) Unconnected/not connected.
- The WiFi signal is out of range, interfered with, etc.
- Does it actually connect, or is there another problem (either way)?
- The problem is either hardware-related or driver-related
- A congested Internet access point and incorrect settings in Windows 10 applications are two other causes of WiFi connection problems.
To solve the “Windows can’t connect to this network” problem
Updated: April 2024
We highly recommend that you use this tool for your error. Furthermore, this tool detects and removes common computer errors, protects you from loss of files, malware, and hardware failures, and optimizes your device for maximum performance. This software will help you fix your PC problems and prevent others from happening again:
- Step 1 : Install PC Repair & Optimizer Tool (Windows 10, 8, 7, XP, Vista).
- Step 2 : Click Start Scan to find out what issues are causing PC problems.
- Step 3 : Click on Repair All to correct all issues.

How F I X
Monsido Quality Assurance, for example, will scan your website every week for broken links and send you a report with them. This tool is the best way to find broken links. By doing so, you can easily keep track of broken links and fix them before they negatively affect user experience or SEO.

Remove your network adapter
- You can access Device Manager by pressing Windows + X.
- Your network adapter can be accessed by right-clicking it.
- Select Uninstall (if prompted, click OK to remove the driver software for this device).
- The new driver will be automatically installed after Windows 10 restarts after you uninstall the current driver.
Update your network adapter drivers
It is possible that your wireless network adapter has outdated drivers that are causing connection problems. Downloading the most recent version of the driver can fix the connection issues.
Internet access and a computer are required for this.
Driver Connection
You can connect to a database using a database connection URL by using your DBMS JDBC driver. The exact syntax of a database connection URL is determined by your DBMS. It may contain information such as the database name, where to search for it, and the connection properties.
Take a USB flash drive or other external source and download the latest drivers for your network adapter from your network adapter manufacturer’s website.
Why Is My Internet Not Working
If you live with a bunch of roommates or relatives who love streaming and gaming, all of you may need to agree on some guidelines or take turns using the internet connection. Of course, first try suggestions such as restarting the router, moving it to a central place, running speed tests, and using an extender for a dead zone. Do avoid putting your router in the kitchen, as microwaves and metal appliances can mess with the signal. So can liquids and food that get spilled on the router. Otherwise, here are ideas for WiFi sharing and communication:
Recursion can be replaced with cross join for a more efficient version.
There should be a resolution to this problem once the latest drivers have been installed.
Users can update the device drivers manually by visiting the website of the manufacturer of the device and downloading the appropriate driver for the device type and model.
In addition to being time-consuming, installing the wrong driver can cause serious problems, which can be prevented by following these steps.
An automated tool, such as a third-party driver correction tool, is the easiest and safest way to update drivers on a Windows computer.
- You can correct your driver with a third-party program.
- The program should be run.
- You can use the software to detect missing, defective, and outdated drivers on your computer.
- You can either update or repair your drivers by selecting them
- Your drivers will be fixed by a third-party program.
- Your computer needs to be rebooted.
Change the channel width of your network adapter
- “Network” can be typed by holding down Windows + S.
- From the list of results, select Network and Sharing Center.
- Change the adapter settings by clicking on it.
- To access the properties of your wireless adapter, right-click its icon and choose Properties.
- Select Advanced.
- The channel width for 802.11 can be changed. Most users need to change the value to 20 MHz, but you may need to change it.
- Your changes will be saved when you click OK.
Disable IPv6 on your computer and router
- The Network and Sharing Center should now be open.
- You can find your current connection by clicking on it in the Connections section.
- You can modify the properties of the connection status by clicking on it.
- Make sure TCP/IPv6 is unchecked.
- Your changes will be saved once you click OK.
- If you want the changes to take effect, restart your computer.
Your router’s user manual should provide instructions on how to disable IPv6 if you are having trouble. Disabling IPv6 on your router can be a complex process depending on its type.
Make sure that your adapter and router use the same type of security
There are several types of security used with wireless connections. One is WPA2-PSK (AES) and the other is WPA-PSK (AES).
A network connection requires the same type of security as your router for it to function properly. The router’s user manual will tell you how to adjust your router’s security type.
The steps below will show you how to set up the same security type on your computer as you do on your router.
- The Network and Sharing Center should now be open.
- Navigate to the Wireless Properties section of your connection.
- Your connection’s security type should be visible on the Security tab.
- You should see the same security type as your router under Security Type (if you don’t see it, try another security type).
- Your changes will be saved when you click OK.
Adding a connection manually
- The Network and Sharing Center should now be open.
- To connect to a network or set up a new connection, click on Set up a new connection.
- Click Next once you’ve selected Manually connect to a wireless network.
- Specify the network name, security key, and security type so that the system can detect your network.
- To continue, click Next.
Changing the security type of the new network should solve the problem. If it still does not work, try establishing a new network connection.
Changing wireless network mode
- The Network and Sharing Center should now be open.
- You need to click Change Adapter Settings, then find and right-click on your wireless network adapter to get properties.
- You can configure the properties by clicking the Configure button in the Properties window.
- The Wireless Mode option can be found under the Advanced tab.
- It should work with 802.11b (or 802.11g), but if it doesn’t, try other options.
Wireless mode can be changed on both router and adapter. Your router and adapter must have a similar mode of operation in order for your network to function.
The user manual for your router can tell you how to modify its network mode, but most of the time, changing your router’s wireless mode will not be necessary.
Forget the wireless connection
- The Network and Internet section can be found in the Settings application.
- Manage known networks can be found under the Wi-Fi section.
- Click the Forget button after selecting your wireless network.
- Once you’ve connected to the wireless network, you’ll need to reconnect.
Disconnect and reconnect your wireless connection
- The Network and Sharing Center should now be open.
- Change the adapter settings by clicking the button.
- Choose Disconnect from the right-click menu when you have found your wireless connection.
- Select Enable from the right-click menu of the same connection.
Install driver manually
- The Network Adapter should be visible in Device Manager.
- You can update the driver software by right-clicking on it.
- To scan for drivers on your computer, click on the Scan My Computer button.
- You can now select a driver from my computer’s list by clicking the Allow me to choose a driver button.
- Uncheck the option to show compatible hardware.
- The driver you want to install for your network adapter can be found by searching for the manufacturer of the device.
- Your computer should be restarted after the driver has been installed.
Use the IP config /release command
- Select Command Prompt (Admin) by pressing Windows + X.
- Press Enter after each line after typing the following commands at the command prompt:
Setting up the IP configuration and releasing it
Configuration and updating of IP addresses - Connect to the network again after closing the command line.
Replace the network adapter
If nothing else works, you can change your network adapter. Some USB WiFi adapters are not compatible with Windows 10. In this case, you may need to replace your current adapter with a newer model.
RECOMMENATION: Click here for help with Windows errors.
Frequently Asked Questions
How do I fix the fact that Windows cannot connect to this network?
- Reinstall the network adapter.
- Disable IPv6.
- Update the network driver.
- Forget about the wireless network and reconnect it.
- Deactivate and reactivate the wireless adapter.
- Use a network card with the same type of protection.
- Add connections manually.
- Wireless mode.
Can’t connect to this network in Windows 10?
Open the Settings app and go to Network and Internet. Go to Wi-Fi and click Manage known networks. Select your wireless network and click the Forget button. After that, reconnect to the same wireless network.
Why won’t my Windows 10 connect to Wi-Fi?
The best solution is to uninstall the network card driver and let Windows reinstall it automatically. Press the Windows + X key and click on Device Manager. Right-click on the network adapter and select Uninstall. When prompted, click Uninstall driver for this device.
I can see the network, but I cannot connect?
If your wireless network appears in the list of available networks on your Surface, but you cannot connect, first make sure that the network is working correctly on the other device. If your wireless network is not working on other devices, the problem may be with the network or the hardware itself.

Mark Ginter is a tech blogger with a passion for all things gadgets and gizmos. A self-proclaimed "geek", Mark has been blogging about technology for over 15 years. His blog, techquack.com, covers a wide range of topics including new product releases, industry news, and tips and tricks for getting the most out of your devices. If you're looking for someone who can keep you up-to-date with all the latest tech news and developments, then be sure to follow him over at Microsoft.
Related posts:
 How to Resolve “No Internet Secured” Error on Wi-Fi Connection
 How to Resolve Limited Connectivity Problem on Windows 10 PC
 How to Troubleshoot ‘No Wifi Networks Found’ on Windows 10 PC
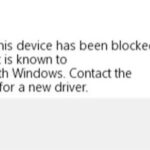 Retrieve Windows error code 48 – “The software on this device has been blocked at startup because it is known to have problems with Windows”