- DISM Host Servicing Process is a process that helps Windows Update and other servicing operations to work correctly.
- The most disturbing aspect of DISMHost.exe is that it duplicates itself in temporary directories.
- The process can also be dangerous because it can self-replicate in temporary folders.
- Superfetch is a Windows 10 feature that helps to improve system performance by pre-loading frequently used apps and files into memory.
- Download and install the software.
- It will scan your computer to find problems.
- The tool will then correct the issues that were discovered.
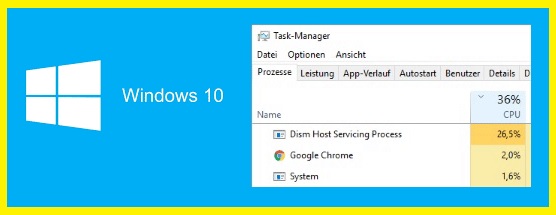
You’re not alone if you’re experiencing high CPU usage with DISM Host Servicing Process. This process makes Windows Update and other servicing operations work properly. The DISM Host Servicing Process is consuming a lot of CPU, so we’ll tell you how to troubleshoot the problem and provide some tips to lower it.
Dism Host Servicing Process Windows 10
A deployment image service and management (DISM) tool can be used to create and manage Windows images (.wim), full-flash utilities (FFUs), and virtual hard disks (VHDs). When running as a background process, Dismhost.exe is referred to as DISM Host Servicing Process.
Dism Hosting Service Process
Windows Preinstallation Environments, or PEs, can be created in the background by using DISM, commonly known as deployment image servicing and management.
Dismhost Exe Process
In spite of the fact that Dismhost.exe is not part of Windows, it is crucial to your computer. It creates many copies of itself, places files in temporary folders, and is probably on your computer from the very beginning. A number of different logs about Window Defenders are also provided by malware or virus writers, and they are placed in multiple folders in order to trick you.
What is DISM Host Service Processing?
The Windows Preinstallation (Windows PE) image environment is configured using the Deployment Image Servicing and Management (DISM) command-line tool. Requires Windows Server 2003 or later.
A number of Windows users have discovered thousands of DISM host maintenance process files. The files are located in the files C:Windows/Temp/ or Users/AppData/local/temp. There are also features in DISMHost.exe that make it extremely disturbing because it duplicates itself in temporary directories. In addition to adding/removing drivers, DISM can list packages and enable/disable Windows features. As a result, a lot of hard drive space is consumed.
In contrast, DISMHost.exe does not open a window. It may be found in the C, Applications, or User folders, but not in the taskbar.
Dism Host Servicing Process High Disk
There are multiple copies of DismHost.exe on Windows systems, as well as multiple temp files formed in those folders, which results in high CPU and disk utilization.
What Is Dism Host Servicing Process
It enables and disables Windows services, mounts and unmounts Windows Image files during critical system updates and will set up Windows Preinstallation Environment.
Why is the DISM Host Service process causing high CPU load?
In addition to being dangerous, the DismHost.exe process can also self-replicate in temporary files. This is not a standard behavior for this file. The system may be slowed down because of a high hard disk load. However, some security tools consider it a threat, while others consider it an important component of the operating system.
Malware can consume a lot of CPU power not only because it control the DISM host service process, but for a variety of other reasons as well. Overheating problems and performance drops can result from excessive utilization of CPU and hard drive over an extended period of time. Some of your system files may also be corrupted, so you should investigate this issue as soon as possible.
First, scan your computer for malware using either an antivirus or Windows Defender program to fix DISM Host Servicing Process issues. Most of the time, malware will cause high CPU, memory, and disk usage by DISM Host Servicing Process.
DISM, or Deployment Image Servicing and Management, is basically a command-line tool that comes with Windows that does deployment image servicing and management. Let’s establish what this service actually is before we get into much detail. In addition to preparing and servicing Windows images, DISM can also be used to repair your Windows operating system if any of your Windows files become damaged or corrupted.
How to solve the problem of high CPU load when processing the DISM host service
Disable the Superfetch service
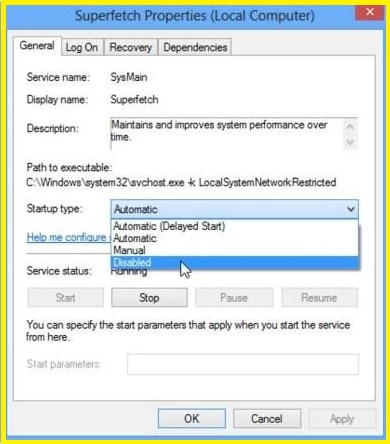
Windows 10’s Superfetch feature preloads frequently used apps and files into memory to improve system performance. When using Superfetch on Windows 10, some users find that it causes their computer to run slowly. In order to disable the Superfetch Service, follow the steps below:
You can select ‘Run’ from the menu by right-clicking the Start button.
Press Enter to launch Services.msc.
3) Locate the “Superfetch” service at the bottom of the list of services.
To open the property window for the service, double-click on it.
4. Rename the startup type to “Disabled” in the properties window.
The service can be stopped by clicking the “Stop” button.
You can now exit Services manager by clicking “OK”.
Your computer’s performance should improve after you disable the Superfetch Services.
Updated: April 2024
We highly recommend that you use this tool for your error. Furthermore, this tool detects and removes common computer errors, protects you from loss of files, malware, and hardware failures, and optimizes your device for maximum performance. This software will help you fix your PC problems and prevent others from happening again:
- Step 1 : Install PC Repair & Optimizer Tool (Windows 10, 8, 7, XP, Vista).
- Step 2 : Click Start Scan to find out what issues are causing PC problems.
- Step 3 : Click on Repair All to correct all issues.

Stop the BIT service
This step-by-step guide will show you how to stop Windows 10’s BIT service:
By pressing the Windows key + R, you can open the Windows Services control panel by typing services.msc into the search box.
You can right-click on Background Intelligent Transfer Service and choose to stop it by clicking on it.
This will stop the BIT service. This will impact some Windows Update features as well as any applications that depend on it. You may be able to improve your computer’s performance by stopping the BIT service if you do not use either of those things.
Run a virus scan
This article shows you how to use Windows Defender to run a virus scan on Windows 10 to protect your PC from viruses and malware.
Windows 10 virus scanner instructions:
To open the Windows Defender Security Center, click the Windows Defender symbol in the taskbar and then click “Windows Defender.”.
In the “Virus & Threat Protection” section, click “Virus & Threat Protection”.
To begin scanning, click “Scan now”.
Our recommendation for most users is to choose “Full scan”.
Start the scan by clicking “Scan”.
As the scan proceeds, you’ll see a list of any viruses and malware found on your computer and will have the chance to remove them.
Run SFC
Windows 10’s system file checker is easy to install and run.
- To get started, click the Start button and then type “cmd” into the search bar to launch the command prompt.
- By typing “sfc /scannow” into the command prompt, you’ll initiate a scan to find damaged or corrupt files and repair them.
- When the scan is completed, you should have a list of any corrupted files the system file checker repaired. Once the scan is completed, you may be prompted to restart your computer if any repairs are made.
Run system restore
Windows 10 offers a feature called system restore that lets you restore your computer to its previous state. You can perform a system restore in Windows 10 if you want to go back to a previous version of Windows or if you have installed an update that is causing problems.
Create a restore point by typing “Create a restore point” in the Start Menu.
Select “System Properties” from the drop-down menu.
The “System Restore” button can be found under the “System Protection” tab.
Then click “Next”.
When you have selected a restore point, click “Next”.
The system restore process should be completed by following the prompts.
RECOMMENATION: Click here for help with Windows errors.
Frequently Asked Questions
Why is dism host servicing process running?
Dismhost.exe is an executable file, and when run as a background process, it is called DISM Host Servicing Process. It is most often used to prepare images for Windows PE (Preinstallation Environment), WinRE (Windows Recovery Environment), and Windows Setup.
Can you disable DISM host servicing process?
DismHost.exe is not a component of the Windows operating system and is often classified as a virus or malware by antivirus programs. Therefore, to eliminate DISM host servicing process high CPU error, you can uninstall DismHost.exe.
How do I fix DISM host servicing error in Windows?
Disable the BIT service. Another way to fix the DISM host servicing process error is to disable the BITS service. This is a service used to transfer files online.

Mark Ginter is a tech blogger with a passion for all things gadgets and gizmos. A self-proclaimed "geek", Mark has been blogging about technology for over 15 years. His blog, techquack.com, covers a wide range of topics including new product releases, industry news, and tips and tricks for getting the most out of your devices. If you're looking for someone who can keep you up-to-date with all the latest tech news and developments, then be sure to follow him over at Microsoft.
Related posts:
 How to fix high CPU utilization by Antimalware Service Executable
 How to Troubleshoot VIDEO_SCHEDULER_INTERNAL_ERROR in Windows 10 PC
 How to Repair “Remote Procedure Call” High CPU and Disk Usage in Windows Computers
 How to Repair “Desktop Window Manager stopped working and was closed” Error on Windows 10 PC