- The “Device not ready” Windows error message usually appears when you try to access data from a USB drive, external hard drive, SD card, or other storage medium.
- Each external device displays a different error message because of the different scenarios associated with it.
- There is no single cause that causes this error; instead, you can try some manual fixes to solve the problem.
- If you are having problems with your USB controller driver on Windows 10, it’s probably because your drivers are outdated.
- Download and install the software.
- It will scan your computer to find problems.
- The tool will then correct the issues that were discovered.
“Device not ready” is a common error message on Windows computers when using flash drives, CD/DVD drives, external hard drives, internal hard drives, virtual disk managers, or diskparts. There are a few reasons why “Device not ready” error messages occur, but their solutions vary from device to device. This error doesn’t have to be a cause for panic if you encounter it on your PC. You will find several effective solutions in the following sections to help you resolve it.
What does “Device not ready” mean?
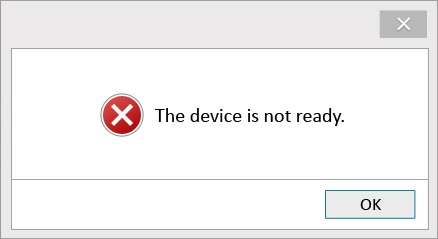
If you try to access data from a USB drive, an external hard drive, SD card, or another storage medium, you usually receive the “Device not ready” error message. Since external devices come with different scenarios, each one displays a different error message. Once this happens, you are unable to access the data on your drive and you receive a message stating that your device is not ready.
What causes the “Device not ready” error?
There is no single cause of the “Device not ready” error, so it is important to check the system event log for more details to understand why this is happening.
External Storage Ready Keeps Popping Up
How important is it to safely eject your external storage devices?
It is not always easy to tell whether your computer is still accessing or writing files to the external storage devices we use. Pulling a memory card out of its reader or removing an external drive out of the USB port could cause corrupted files, unreadable media or both. Ejecting your external storage safely decreases these chances. Whether you are using a Windows-based computer or a Mac, you can safely remove your external storage devices using built-in utilities designed for disconnecting hardware.
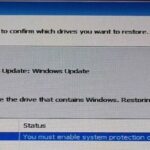
The Device Is Not Ready Disk Management
Right click the drive that with file system error or bad sectors and select Properties. Select Tools under the Error checking section and then click Check. The drive will be checked for errors.
- Failure of hardware.
- Connections that are faulty.
- Issues with compatibility.
- Bad sectors on a disk.
- File system damage on Windows.
- We are already using external media.
- There are problems with the drivers for USB controllers.
- Drives that are broken or malfunctioning.
- Digital device damage.
- The use of malicious software or the spread of viruses.
In reality, there are many reasons why this error occurs, however you don’t necessarily have to be an expert to resolve it. Instead, you can try some manual fixes.
Updated: April 2024
We highly recommend that you use this tool for your error. Furthermore, this tool detects and removes common computer errors, protects you from loss of files, malware, and hardware failures, and optimizes your device for maximum performance. This software will help you fix your PC problems and prevent others from happening again:
- Step 1 : Install PC Repair & Optimizer Tool (Windows 10, 8, 7, XP, Vista).
- Step 2 : Click Start Scan to find out what issues are causing PC problems.
- Step 3 : Click on Repair All to correct all issues.

How to fix the “Device not ready” error?
Reinstall the USB driver

For this purpose, go to the Control Panel > Add or Remove Programs > choose “Uninstall.” Find the USB drivers listing and click on it to uninstall them.
To install the USB driver, you first need to download it from the manufacturer’s website. Once you have downloaded it, you need to run the installer and follow the instructions.
2. Once you have connected your USB device to your computer, you’ll need to run the “Hardware Update Wizard” so the new drivers can be installed. You should now be able to use your USB device without any problems if you follow the instructions on the screen and restart your computer when prompted.
Uninstall the USB controller driver
Windows 10 USB Controller Driver problems are often caused by outdated drivers. Here’s how to reinstall your drivers.
Secondary Hard Drive Ready Or Not
Go back out of the bedroom and into the living room, then follow the stairwell down from where you entered the house to the second floor. The first hard drive is at the bottom of the staircase.
- Start Menu > All Programs > Programs & Features > Device Manager .
- You can expand the section “Universal Serial Bus controllers” by finding it on the left sidebar.
- Select “Uninstall” from the right-click menu of your USB Controller Driver.
- From the manufacturer’s website, download and install the latest driver.
- The problem may be resolved by rebooting your computer.
Windows 10 USB Controller Driver should work again if you follow these steps.
Check connection of the device – USB/External drive
In order to fix the “Windows 10 Device Not Ready” issue, you should ensure that the error is not due to faulty USB ports or connections on your computer. In order to check the connection, follow these steps:
- Check to make sure the device was connected correctly before reconnecting it to your computer.
- It will take about two minutes to unplug the device.
- Use a different USB port to connect the device to the computer.
- The external storage device should now show up in the operating system properly. Repeat this procedure with other USB ports until it is recognized.
- Reconnect the USB cable, check if the error still occurs, and replace the USB cable if necessary.
- Check the device’s compatibility on another PC.
Perform an SFC scan
The operating system Windows 10 is excellent, and it is continuously improving. Its SFC scan tool has been greatly improved in recent years. A simple step-by-step guide to performing an SFC scan on Windows 10 will help you repair corrupted files and improve the performance of your computer.
The Device Is Not Ready Initialize Disk
Hence, when you cannot access the device due to an error i.e. the device is not ready, it is because of the faulty connections, faulty drives, faulty disks, corrupted file systems, or faulty disk managers. Corrupted files or file systems can also cause the error. This article explains the error in depth along with all the potential reasons. In case you replace the drive, you have to recover the files (data). Recoverit data recovery is the recommended third party application software. Moreover, built-in utility methods are explained to resolve the error along with respective situations.
- You can open the Command Prompt by typing it in the Start Menu.
- Select “Run as administrator” from the context menu after right-clicking the Command Prompt shortcut.
- Press enter to launch sfc /scannow.
- Please be patient as the scan will begin shortly.
- You can check if the issue has been resolved by restarting your computer after the scan is complete.
SFC scans are easy to perform on Windows 10 by following these simple steps.
Run the hardware and device troubleshooter
Hardware and device issues are inevitable for anyone who uses a computer. In Windows 10, there’s a built-in hardware and device troubleshooter you can use to resolve many common problems. The following guide will show you how to run it:
- You can find Troubleshoot on the taskbar by typing ‘troubleshoot’ into the search box.
- You can run the troubleshooter on the Troubleshooting page by selecting ‘Hardware and Devices’.
- This will activate the troubleshooter, which will search for and resolve any issues with hardware and devices on your computer.
- Check if the issue is resolved by restarting your computer once the troubleshooter has finished.
The hardware and device troubleshooter on Windows 10 can be run quickly and easily by following these simple steps.
RECOMMENATION: Click here for help with Windows errors.
Frequently Asked Questions
What are some simple steps to follow in order to perform an SFC scan on Windows 10?
- Open the Start Menu and type "Command Prompt" into the search box.
- Right-click on the Command Prompt shortcut and select "Run as administrator."
- Type "sfc /scannow" into the command prompt and press Enter.
How can I connect my storage device to another PC?
If you want to connect your storage device to another PC, you can do so by using a USB cable. Simply connect the two devices with the USB cable and then turn on your computer. Your storage device should now be recognized by the other PC.
What should I do if the external storage device is not readable?
If the external storage device is not readable, you can try connecting it to another PC to see if it is readable on that computer. If the device is still not readable, you may need to format the device or replace it with a new one.
How can I fix the “Device is Not Ready” problem on Windows 10?
There are a few possible solutions to the "Device is Not Ready" problem on Windows 10:
- Unplug the device and wait about 2 minutes.
- Connect the storage device to another PC to check whether the device is readable or not.
- Perform an SFC scan.
- Run the hardware and device troubleshooter.

Mark Ginter is a tech blogger with a passion for all things gadgets and gizmos. A self-proclaimed "geek", Mark has been blogging about technology for over 15 years. His blog, techquack.com, covers a wide range of topics including new product releases, industry news, and tips and tricks for getting the most out of your devices. If you're looking for someone who can keep you up-to-date with all the latest tech news and developments, then be sure to follow him over at Microsoft.