- Valve Corporation announced SteamVR in 2015, a superior 360° VR tool for your VR content on Microsoft Windows.
- Some VR enthusiasts see error 1114 every time they try to open the Steam VR tools to use their Occulus Rift headset.
- This particular error code occurs in all versions of the Windows operating system, from Windows 7 to Windows 10.
- If you want to fix this problem, first perform a simple reboot and see if that fixes the problem.
In 2015, Valve Corporation announced SteamVR, a 360° VR tool for Microsoft Windows. SteamVR works with Valve Index headsets, Oculus Rifts, HTC Vives, and Windows Mixed Reality. The SteamVR runtime environment has been reported to be problematic for some users, who have received error 1114 when trying to run the SteamVR tools.
As we mentioned above, SteamVR is compatible with many VR headsets, including the Oculus Rift, Valve Index, HTC Vive, Windows Mixed Reality, etc. As for this particular error code, it has been reported that it occurs on all versions of Windows 7, up to Windows 10. However, it is mostly associated with the Oculus Rift VR headset.
My Oculus Quest is no longer working correctly after using SteamVR to play games in the past. I last played on May 29th without issue. I haven’t tried SteamVR since I last played on May 29th.
There are many different types of VR hardware currently available, offering varying levels of immersion and interactivity. Low-cost solutions such as cardboard viewers that hold a smartphone in front of the user’s eyes offer a low-cost way of experiencing VR [35] (there are also state of the art VR systems that track the user’s entire body from head to feet such as Vicon Origin [37]. CAVE set-ups have been used for drug discovery in the past, however they are expensive, costing hundreds of thousands of dollars for a high-end set-up [39], and can have problems with immersion if the glasses do not cover the peripheral vision as well as problems with ventilation and claustrophobia [41–43]; (ii) they are portable and lightweight; (iii) users experience a wide field of view (ranging between 90 and 130 degrees in the horizontal dimension); (iv) they have good spatiotemporal resolution; and (v) the experience can be fully immersive.
It’s been working fine for some time now using Steam VR through Virtual Desktop.
Here are some troubleshooting steps to easily resolve the issue if you’re having the same issue with the SteamVR tool and Oculus Rift VR headset. Let’s get started with the guide below!
What causes SteamVR error 1114 on Windows 10

Among the VR headsets supported by SteamVR are the Oculus Rift, Valve Index, HTC Vive, Windows Mixed Reality headsets, and more. This particular error code is mainly reported to occur on Oculus Rift VR headsets. However, all versions of Windows, from Windows 7 to Windows 10, also appear to display this particular error code.
It has been confirmed that error 1114 occurs on Windows 10, Windows 8.1, and Windows 7 when users try to open Steam VR tools to use their Occulus Rift.
The bug 1114 will finally be fixed when you restart Occulus. Many affected users have the same experience and have confirmed a simple restart resolves the issue.
Typically, when Oculus tools have just been updated and the operating system needs to be rebooted to complete the update process, you will need to perform a simple reboot to fix error 1114.
There is also the possibility that corrupted dependencies can lead to this problem, preventing SteamVR from initializing correctly. If you encounter this problem, you can restore the entire installation by using OculusSetup executable.exe. If this does not work, you should perform a complete reinstallation.
How to fix the SteamVR Error 1114 in Windows 10
We highly recommend that you use this tool for your error. Furthermore, this tool detects and removes common computer errors, protects you from loss of files, malware, and hardware failures, and optimizes your device for maximum performance. This software will help you fix your PC problems and prevent others from happening again:
Updated: April 2024

Please Verify Steamvr Is Properly Installed
An incorrect directory was specified for SteamVR program files, which is the cause of this error.

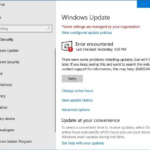
Update your Windows operating system and Oculus software
In addition to causing many errors, running an older version of Windows can also make it difficult to run new software and technology like this. If your Windows operating system or Oculus software is outdated, you are almost guaranteed to encounter software bugs like this. It is also never a bad idea to update your operating system with the latest patches and fixes.
If in doubt, restart your computer to be sure. Once you’ve done that, you may see the changes apply to Oculus.
Your Internet speed and the size of the update will determine how long it will take to update either of these applications. Major Windows updates may require a reboot.
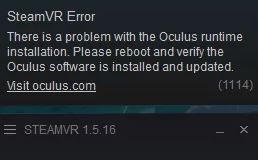
Oculus Runtime Installation
The Oculus runtime installation is not working. Please reboot and make sure that the Oculus software has been updated and installed.”
Windows can be updated in the following ways:
- If an update is available, you should see a clear indication on the screen once you open the Start menu and click on “Updates.”
- The update process starts once you select “Download” from the menu.
There are different steps you should follow depending on the Oculus Rift model you are using to update the software. Here is a general guide to updating the Oculus software:
- Open the Settings menu on your Oculus headset.
- Go to About by clicking View All.
- Your Oculus version, along with the notification of an update, should be displayed there.
- The software needs to be updated, downloaded, and installed.
- Try running SteamVR again after updating your primary devices.
Fix the Oculus installer
If there are software errors in Oculus’ software, users have the option to fix them themselves without getting in touch with support.
Since this is a relatively new technology, this is especially useful to those who are unfamiliar with Oculus.
If you are having issues with your Oculus, follow the directions below:
- Download the official Oculus installer, or use your existing download if you already have it, but don’t forget to update it if you already have.
- If you use this method, you should choose Repair if the installer says you already have Oculus installed. This will show you a selection of options.
- To complete the restoration of your Oculus software, follow the instructions.
- The changes may be applied once Oculus is restarted.
- Whenever you need to ensure the safety of your computer, restart it.
Reinstalling Oculus
When all else fails, you can reinstall Oculus as a last resort. Reinstalling the software should prevent any further software bugs, installation issues, or other problems.
Oculus can be uninstalled using these steps:
- The first step is to select the “Add or Remove Programs” system setting from the Start menu.
- Once you’ve found Oculus, you can look for the software in your computer’s list of installed programs.
- Follow the instructions to uninstall Oculus completely from your computer after you find it.
- Install Oculus from the official website after you uninstall it.
- Make sure you have 15 GB of free space on your computer before running the installer.
- After reinstalling the program, check if the error persists. If it does, contact the support team.
Reboot your computer
When you restart your computer, all software processes in the Steam app and VR program will be terminated and restarted. This will eliminate any problems with the software in the background. We recommend restarting your computer or laptop from time to time, as it is good for the health of your computer.
A reboot is also a great way to clear up any software problems accumulated in your operating system’s background.
Your computer or laptop can be rebooted by following these steps:
- By clicking the Windows icon in the bottom left corner of the screen or by pressing the Windows key, you will enter the Start menu.
- To do so, hover your mouse over the Windows icon and select the power icon.
- To begin rebooting your computer, select Reboot from the list of options above the power icon.
- Check to see if the problem persists once you have rebooted your computer and opened SteamVR and the Oculus Rift app.
RECOMMENATION: Click here for help with Windows errors.
Frequently Asked Questions
How do I fix Steam VR?
- Turn off SteamVR.
- Disconnect the power and USB cables from the PC on the Link Box side (not the orange side).
- Wait a few seconds, then reconnect the power and USB cables to the Link Box. Additional drivers may be installed. Wait for this process to complete.
- Launch SteamVR.
- Repeat steps if necessary.
How do I fix SteamVR 308?
- Close Steam and SteamVR completely.
- Go to ".../username/AppData/Local/openvr" and delete "openvr. vrpath". OR. Go to "...Steam/steamapps/common/SteamVR/bin/win64" and run vrpathtreg to fix the path.
- Restart Steam and SteamVR.
How do I fix the 301 error on SteamVR?
The 301 error is a relatively common error for many SteamVR users, caused by not being able to start or connect to vrserver.exe. This often occurs when the executable is already running, which can be detected using the Windows Task Manager. If vrserver.exe is running, stop the process and try running SteamVR again.
How do I completely reinstall SteamVR?
- In the Steam desktop client, open the Library drop-down menu.
- Select Tools from the drop-down list.
- Find SteamVR in the Tools library.
- Right-click on SteamVR and select Properties.
- Click the Local Files tab.
- Click Delete Local Tool Content.

Mark Ginter is a tech blogger with a passion for all things gadgets and gizmos. A self-proclaimed "geek", Mark has been blogging about technology for over 15 years. His blog, techquack.com, covers a wide range of topics including new product releases, industry news, and tips and tricks for getting the most out of your devices. If you're looking for someone who can keep you up-to-date with all the latest tech news and developments, then be sure to follow him over at Microsoft.