- Windows Update error code 0xc1900130 may occur when the network connection between the client computer and the Windows Update server is lost and installation cannot proceed because the instance hash value is not found.
- If you encounter this problem, for example when installing a feature update, you should first check your Internet connection and then try again.
- If that doesn’t help you, you will find some suggestions in this post that will help you.
- Download and install the software.
- It will scan your computer to find problems.
- The tool will then correct the issues that were discovered.
You may want to try the fixes detailed in this article if you have been experiencing error 0xc1900130 or similar failure messages.
It is important to understand how to fix Windows update issues on Windows 11. In this document, we share the basic troubleshooting steps for fixing Windows update issues on Windows 11. Most update problems are resolved simply by restarting your computer. Only a PC with the minimum hardware requirements can upgrade to Windows 11.
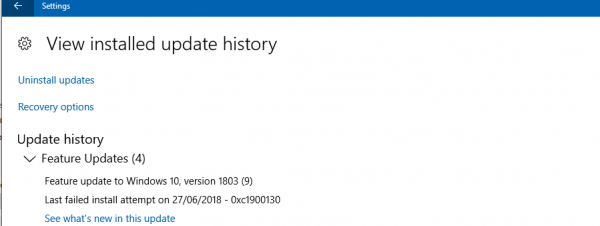
Windows Update error code 0xc1900130 may occur when the network connection between the client computer and the Windows Update server is lost and installation cannot proceed because the instance hash value is not found. You may see the following message under Settings – Installation Failed – 0xc1900130. If you encounter this problem, for example when installing a feature update, you should first check your Internet connection and then try again. If that doesn’t help you, you will find some suggestions in this post that will help you.
0xc1900130
Can you explain what error 0xc1900130 means?
A poor Internet connection can cause Windows update errors, which are quite common. As well, when you are downloading the Windows 11 update, you receive error 0xc1900130 as a result of a bad Internet connection. You may see the error 0xc1900130 on your screen if your update process is interrupted by a network.
In technical detail, we have the following:
It is an error code 0XC1900130.
MOSETUP_E_INSTALL_HASH_MISSING message.
It was not possible to find a hash to proceed with the installation.
The new feature update for Windows 10 has been continuously failing for me when trying to update it, giving me the error 0xc1900130. It has been happening for over a week now, and I do not expect it to go away any time soon. If you know how to fix this, please let me know.
When your Internet connection is poor, you are more likely to encounter Windows update errors. A similar error, 0xc1900130, is caused by a poor Internet connection, which usually appears during the download of Windows 11. It is caused by an interruption in the network that causes the updates to pause/stop, resulting in Windows 11 update error 0xc1900130.
What is the cause of error 0xc1900130 in Windows Update?

Third-party AV interference: It turns out that an AV kit or an overprotected firewall may be responsible for freezing the relationship between the client machine and the Windows Update server. More often than not, AVG is to blame for encouraging this error code to appear. If this scenario applies, you may be able to solve the problem either by disabling real-time protection during the update installation or by removing the third-party package completely.
The conflict between the Intel RST driver and Windows 10: There is a driver file (iastorac.sys) that often blocks communication with the update server. This Intel RST file is known to conflict with older versions of Windows 10, especially versions 1900 and older. In this case, you can solve the problem by installing the iastora driver. and make your Windows installation ignore it.
Damaged WU component: As confirmed, this particular error code can also occur due to a corrupt glitch or dependency that interrupts the update process. If this scenario applies, you may be able to resolve the problem by using the automatic WU agent to reset all relevant components, or by doing it manually with an extended CMD prompt.
Another third-party conflict: It is also possible that a recent system change, caused by a partially incompatible driver or application, could affect the upgrade component. In that case, you should be able to fix the problem by using the System Restore feature to return the system to a healthy state in which this problem did not occur.
How to fix the 0xc1900130 Windows Update error?
Updated: April 2024
We highly recommend that you use this tool for your error. Furthermore, this tool detects and removes common computer errors, protects you from loss of files, malware, and hardware failures, and optimizes your device for maximum performance. This software will help you fix your PC problems and prevent others from happening again:
- Step 1 : Install PC Repair & Optimizer Tool (Windows 10, 8, 7, XP, Vista).
- Step 2 : Click Start Scan to find out what issues are causing PC problems.
- Step 3 : Click on Repair All to correct all issues.


Open Windows Update Troubleshooting
You should still try the Windows Update Troubleshooter if your update fails, even if it doesn’t fix the problem.
- The Windows 10 taskbar has an “Enter here to search” button. Click this button to launch this diagnostic tool.
- To find troubleshooting options, type “troubleshooter” into the text box.
- Under Settings, click Troubleshooter.
- Run Troubleshooting after clicking Windows Update.
- In cases where a solution has been suggested by the troubleshooter, click Apply Patch.
Run any necessary update services
Windows Update requires the activation of all services.
- Windows 10’s search box can be accessed by typing cmd.
- Choose Run as Administrator when right-clicking the command line to open it with high privileges.
- At the command prompt, enter these commands individually:
The SC configuration specifies that Wuauserv should start automatically
SC bits configured to start automatically
Ensure that cryptsvc start is set to automatic in the SC configuration
Configure trustedinstaller to start automatically in SC
Resetting Windows Update
In some cases, windows update 0xc1900130 was fixed by resetting it.
- The second solution requires an extended command line.
- Enter the following commands one at a time (as you enter each command, press Enter):
Shut down Wuauserv
Stop the cryptSvc service on the network
Bits that stop the network
MSYS Server must be stopped on the network - The next step is to rename the SoftwareDistribution folder so it can be removed.
Press the Return key on your keyboard after you enter ren C: WindowsSoftwareDistribution SoftwareDistribution.old. - Type the following command:
Catroot2.old is located in C:WindowsSystem32catroot2.
Catroot2 will be reset by renaming this folder. - The services can be restarted at the command prompt by typing these commands:
Networking starts for Wuauserv
Start the encryption of the network
A start bit for the network
Messer starts on the network. - Your computer or laptop will then need to be rebooted.
Rename the file iastora.sys
Iastora driver conflicts can cause error 0xc1900130.
- Press the Windows key combination plus E to open the file explorer to fix the problem.
- Once that is done, open File Explorer and navigate to this folder: C: – Windows – System32 – Drivers.
- Choose Rename from the context menu when you right-click on iastora.sys.
- You should now be able to see the file iastora.sys.old if you enter the file name as iastora.sys.old.
- When prompted by UAC, click Yes.
- Before checking again for updates, reboot Windows first.
Restore Windows 10 to an earlier date
When your Windows 10 computer does not yet have the 0xc1900130 error, you can restore it using the system restore feature.
- Run can be accessed by right-clicking the Start button.
- You can restore your system by typing restore and clicking OK.
- Continue by clicking Next.
- Click Show additional restore points to view the entire list.
- To fix error 0xc1900130, select a restore point.
- For an uncertain restore point, select the oldest.
- You will be able to remove any software and updates that have been installed since the selected restore point.
- For more information about the software that was removed by the selected restore point, click Find Affected Programs.
- Windows 10 will be rebooted and reset when you click Next and Finish.
Windows 10 updates can be obtained with the above fixes.
In addition to using the Microsoft Update Catalog to install cumulative updates, you can also download and install them manually.
The updates can be downloaded from here by entering their KB numbers into the search box.
Windows Update error can usually be fixed in an instant if you follow the troubleshooting steps above.
RECOMMENATION: Click here for help with Windows errors.
Frequently Asked Questions
What is 0xc1900130?
Windows Update error code 0xc1900130 occurs when a user tries to install a pending update through the automatic WU component. This particular error code indicates that the network connection between the client computer and the Windows Update server has been interrupted in some way.
How to resolve error code 0xC1900101?
If you get error code 0xC1900101, the problem may be caused by your antivirus software. To solve the problem, you need to completely uninstall your antivirus software and try to reinstall the update. This problem can be caused by any third-party antivirus program, so make sure you uninstall it and try to update again.
How can I fix error 0x80070652?
If error code 0x80070652 occurs when you try to install a certain update through Windows Update Center, you can get around the problem by reinstalling the update file. Do the following: Start your browser and go to the Microsoft Update Catalog. Look for the update file you need.
How do I fix a Windows installer error?
- Click Start. Typical Services.
- Right-click on the Windows Installer, and then select Properties.
- If Startup Type is set to Disabled, change it to Manual.
- Click OK to close the properties window.
- Right-click the Windows Installer service, and then click Start.
- Try installing or uninstalling it again.

Mark Ginter is a tech blogger with a passion for all things gadgets and gizmos. A self-proclaimed "geek", Mark has been blogging about technology for over 15 years. His blog, techquack.com, covers a wide range of topics including new product releases, industry news, and tips and tricks for getting the most out of your devices. If you're looking for someone who can keep you up-to-date with all the latest tech news and developments, then be sure to follow him over at Microsoft.