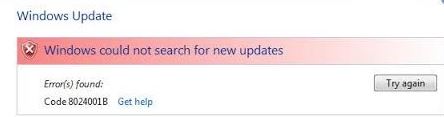
- Windows Update error 8024001B is an error name that contains details about the error, including the cause of the error.
- The numeric code in the error name contains data that can be deciphered by the manufacturer of the faulty component or application.
- Download and install the software.
- It will scan your computer to find problems.
- The tool will then correct the issues that were discovered.
Windows Update error 8024001b is an error name that contains details about the error, including the cause of the error, the system component or application that caused the error, and other information. The numeric code in the error name contains data that can be deciphered by the manufacturer of the faulty component or application. The error in this code can occur in different places in the system, so even if the name contains some detail, it is still difficult for the user to find and fix the cause of the error without special technical knowledge or appropriate software.
Can anybody help me with this update issue? I am getting error code 8024001B when trying to install updates. Do you have any recommendations for how to fix this? I searched on this site and tried Clem Cadiddle Hopper’s suggestion. Now, I can’t get any updates, and I keep receiving error code 80073712.
A Windows Update component that doesn’t work properly is usually responsible for this error. If you notice that they begin to work incorrectly, you can resolve it with a reset procedure. This is possible either because of a bug or because they’re corrupted.
What is the cause of Windows Update error 8024001B?

If you get this warning on your computer, it means that there is a malfunction in your system. Windows Update 8024001b Error Code” is one of the problems faced by users as a result of the improper or failed installation or removal of software that may have left invalid entries in system components, incorrect system shutdown due to power outage or other factors, accidental deletion by someone who does not have sufficient technical knowledge of the necessary system files or entries in system components, and a number of other reasons.
How to fix Windows Update error code 8024001B?
Updated: April 2024
We highly recommend that you use this tool for your error. Furthermore, this tool detects and removes common computer errors, protects you from loss of files, malware, and hardware failures, and optimizes your device for maximum performance. This software will help you fix your PC problems and prevent others from happening again:
- Step 1 : Install PC Repair & Optimizer Tool (Windows 10, 8, 7, XP, Vista).
- Step 2 : Click Start Scan to find out what issues are causing PC problems.
- Step 3 : Click on Repair All to correct all issues.


Run Windows Update Troubleshooting
However, the vast majority of these cases are caused by EC components rather than external processes or services, as can be seen from the section above.
The best way to start troubleshooting is to run the Windows Update diagnostic tool to see if it is possible for Windows to resolve the problem automatically.
The Windows Update diagnostic tool should already have a recovery strategy in place if the problem you are experiencing is documented by Microsoft, and it will automatically fix it. The utility and the recommended recovery strategy were able to resolve the error for several Windows users who also encountered the 8024001B error.
The following step-by-step instructions will help you diagnose the problem using Windows Update:
- The Troubleshooting tab of the Classic Control Panel interface can be accessed by pressing Windows + R and typing control.exe / Microsoft.troubleshooting name.
Note: If you see UAC (user account request), click “Yes” to grant administrative privileges. - Select Troubleshooting from the list of results on the left of the Classic Control Panel interface using the search box in the upper right corner.
- You can perform a Windows Update (on Windows) by clicking on the Windows Update option in the troubleshooting window.
- Click on Advanced to bring up the Windows Update Troubleshooting Assistant. Select Automatically Troubleshoot Apply and then click Next.
- As your utility detects problems, it will provide you with possible repair strategies. You can then select one from the list and click Apply this repair.
- You can try to update the system again if the computer doesn’t restart automatically.
You may continue to the next method below if you still encounter the 8024001B error.
Resetting all EC components
In addition to a WU (Windows Update) mismatch, another common scenario that causes error 8024001B is a software update conflict.
As far as we know, all affected users were able to fix the behavior by resetting all items and dependencies involved in the issue.
You can use the advanced CMD prompt to perform a manual reset of all Windows Update components following this quick guide:
- Open the extended command prompt by pressing Ctrl + Shift + Enter from a text box and typing “cmd” in the box. Allow user access to the extended command prompt by selecting Yes when prompted for UAC (User Account Control).
- For all major EC services to be stopped, enter the following commands at the extended CMD prompt in order, pressing Enter after each command.
Stop the Wuauserv network
cryptSvc needs to be stopped from the network
Static packets on networks
My server has been stopped by the network
Note: After running these commands you will stop all of the important Windows Update services (Windows Update, MSI install service, crypto service, and BITS service). - The SoftwareDistribution and Catroot2 folders will be renamed when you run the following commands at the same CMD command prompt after all these services have been shutdown. Press Enter after each command.
Then open the file WindowsSoftwareDistribution SoftwareDistribution.old.
It is located in WindowsSystem32catroot2 catroot2.old.
Note: These two folders are important since they are responsible for storing the update files used by the Windows Update component. Renaming them essentially forces the operating system to create new instances to take their place and bypass any type of file corruption. - You need to restart the previous disabled services once you have completed step 3:
The Wuauserv network has been started
The encryption of the network starts
Initiators for networks
Messer starts on the network. - If you are still seeing the 8024001B error code, check for updates again.
The next possible solution is below if the problem remains the same.
Using the system restore utility
The WU component might have been affected by a recent system change, or a third-party service or process may have caused it.
The use of a system recovery utility will be presented as a cost-effective approach because it is impossible to list every potential culprit.
The latest version of Windows will support modern applications – such as those installed from the Store – as well as traditional escritorial apps.
If you have created a previously created snapshot, you can use it to restore your entire computer to an earlier state before the error 8024001B occurred.
In Windows, when you perform important actions (such as installing a critical update or installing a driver), Windows is configured by default to periodically record a system restore snapshot. You should have plenty of restore points if you haven’t changed this behavior by default.
WSUS came up with this error for me when I changed my WSUS source from the default Microsoft site to the Internal WSUS server. To fix, follow these steps (credit goes to Bsod from Microsoft Answer Forum):
Note: Before you use this utility, keep in mind that any changes you have made since the restore point was created will be lost if you use it to restore your device to an earlier state. This includes installed apps, drivers, third-party apps, games, etc.
For more information on how to begin the recovery process, follow the instructions below:
- The system restore menu can be accessed by pressing Windows + R and typing “rstrui” in the text box. Press Enter to open it.
- In order to move on to the next step, click Next on the main System Restore screen.
- You must first select “Show more recovery points” on the next screen. You can now choose to move on to the next menu by selecting the correct system restore. Click Next to move on to the next menu after selecting the correct system restore.
- It is now ready to be used. All that needs to be done is to click Finish to begin the recovery process.
- Once the reboot has completed, check again to see if the problem persists and check for updates once again.
Continue to the next step if error code 8024001B still appears.
Update all operating system components
The error 8024001B cannot be bypassed if one of the above instructions fails. If you cannot resolve the issue by following the usual steps, it indicates you have a system file problem. It is only a procedure that updates all Windows components that should be able to fix the issue in this scenario.
Clean installation and repair installations (in-situ repairs) are the only ways to completely reset your system files. The main disadvantage of a clean installation is that it does not allow you to keep your files (apps, games, personal media, user settings, etc.).
You will also be able to keep all your applications and games (including personal data) if you use a repair shop (on-site upgrade).
RECOMMENATION: Click here for help with Windows errors.
Frequently Asked Questions
How to fix error 0x8007000e?
- Open the Windows Update troubleshooter. Windows Update troubleshooter can provide a solution for error 0x8007000e.
- Run a check on the system files.
- Rename the software distribution folder.
- Make sure that the Windows Update service is enabled.
- Use the update wizard.
How do I fix error 0x8024000B?
- Click Start, then Run. If you don't see Run on the Start menu, type Run in the Start search box, then click Run in the list of results.
- Copy and paste the following text into the Run text box: Cmd /c ren %systemroot%System32Spupdsvc.exe Spupdsvc. old.
- Click OK.
- Run Windows Update again.
How to fix error 0x80080005?
- Disable third-party antivirus software.
- Run the SFC and DISM scanners.
- Run the Windows Update diagnostic program.
- Reset Windows Update components.
- Pick up the system volume directory.
- Modify the registry.
- Disable the Windows Update service.
How to fix error 0x80240fff in Windows 10?
- Move the updates.
- Use the multimedia creation tool.
- Run the Windows Update diagnostic tool.
- Restart the Smart Background Transfer service.
- Reset Windows Update components.
- Disable virus/malware/firewall protection.
- Disable the VPN software.

Mark Ginter is a tech blogger with a passion for all things gadgets and gizmos. A self-proclaimed "geek", Mark has been blogging about technology for over 15 years. His blog, techquack.com, covers a wide range of topics including new product releases, industry news, and tips and tricks for getting the most out of your devices. If you're looking for someone who can keep you up-to-date with all the latest tech news and developments, then be sure to follow him over at Microsoft.