- Many Windows 10 users report that Windows cannot access a shared folder on their PC.
- This can be a problem, and in today’s article, we will show you how to fix this problem.
- The inability to access network shares can be very annoying.
- If other computers can see shared folders and yours cannot, you need to fix the problem.
- Download and install the software.
- It will scan your computer to find problems.
- The tool will then correct the issues that were discovered.
One of the most powerful features available in modern computing is the use of local area networks (LAN). That allows you to share movies or music files across all the devices in your home or office. You can also use a network to set up a media server, to share printers and scanners. Or just to share files between two machines. Although in principle networking your computers are simple, in practice it can be a pain to make it running properly. A common problem is the inability of one machine to see the shared folders on another machine. In Windows 10 this problem has been fixed now to a great extent, but it does still happen. In this article, We will show you how to fix the shared folder issue in Windows 10.
Our article today will show you how to solve the problem users have with Windows 10 being unable to access shared folders.
Sharing File On Network
A computer and a server can share files over a network in two ways: directly between them.
When I cannot access public folders in Windows 10, what should I do? You must enable folder sharing and network discovery first if you want to solve this problem. To do so, simply check the network settings window. To fix the problem, check that the necessary services are set to start automatically if it persists.
Windows Cannot Access Network Drive
If your Windows computer and your computer’s network is not properly configured, or if your folders or printers are not shared, the error might occur. Usually, it is caused by incorrect sharing permissions on the shared network computer and/or by an invalid username password.
Share A Folder In Windows 10
Using the context menu provided by right-clicking the folder you wish to share, you can share the folder.
One XPS13 and one XPS15 are in our home private LAN. I share C:/Users/Public between the two PCs. I have the XPS13 set to share files. Both PCs are hardwired into the network, with file sharing enabled under ‘Private Networks’ and password protection disabled under ‘All Networks’.
When your computer cannot access shared folders, which other computers can, it can be very annoying. This guide explains how to solve this issue.
Folder Sharing In Windows 10
Make a folder on your computer in any location you wish.
What is the cause of the “Can`t see and access shared folders” message in Windows 10?

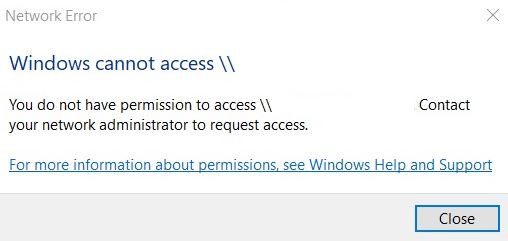
Most of the time, when you receive the message “Windows cannot access computer name,” it’s because of a local connection error. The problem can be caused by a lack of permissions on the network, improperly installed network drivers, or even a corrupt Windows registry.
You should see the name of the Windows laptop on the Windows Network. Click on this and you’ll see the shared folder you shared in Step 1.
It is most common for this error to occur after making a new LAN connection on your network, and most importantly, it appears each time you attempt to open a shared folder from another computer.
This network error occurs in both folders and network files, and you may even receive it when accessing a shared network drive.
Ignoring the problem and trying to fix it manually can sometimes be very difficult.
How to fix the “Can`t see and access shared folders” problem in Windows 10
Updated: April 2024
We highly recommend that you use this tool for your error. Furthermore, this tool detects and removes common computer errors, protects you from loss of files, malware, and hardware failures, and optimizes your device for maximum performance. This software will help you fix your PC problems and prevent others from happening again:
- Step 1 : Install PC Repair & Optimizer Tool (Windows 10, 8, 7, XP, Vista).
- Step 2 : Click Start Scan to find out what issues are causing PC problems.
- Step 3 : Click on Repair All to correct all issues.

In the Properties dialog box, right-click on the folder, then select the Sharing tab. Check the Shared label along with the folder’s path under Network File and Folder Sharing.

The process of sharing resources within the network has been greatly improved in Windows 10. However, there are still problems, but networking and sharing resources within the network no longer have to be as challenging. In theory, everything works just as it should after you set up a network share. With Windows 10, networking has become a lot easier.
Setting up networking in Windows 10
This is a complete guide on how to correctly configure Windows networking in Windows 10. It’s the most common cause of network problems in Windows 10.
- Choose “Control Panel” from the search bar on Windows after typing “management.”
- The network and sharing center can be found under “Network and Internet.”
- To change the adapter settings, click the “Change adapter settings” button.
- The network adapter’s properties can be accessed by right-clicking it.
- Enable IPv6.
- Click OK.
- To change advanced sharing settings, select Change advanced sharing settings from the Network and Sharing Center.
- For single, guest, public, and all networks, make sure Network Discovery and Shared Files and Printers are enabled.
- Ensure that the network device is configured automatically if necessary.
- Share your files with a password.
- The sharing of folders should be enabled on all networks.
- Media streaming options can be selected.
- Stream media is enabled once you select this option.
- Click OK.
Let’s set up the shared folders after installing the basic network. When the basic network has been installed, keep the Network and Sharing Center window open.
- You can share a folder by right-clicking it in Windows Explorer.
- Go to the Properties tab.
- Share is the tab you need to click.
- The Share button will appear.
- Add the users with Microsoft accounts who usually log into other computers with yours to gain access to your files in the window that appears.
- If there are no specific home network users on your network, select “All”.
- Click Add.
- Users with “Read” permissions can read files; users with “Read/Write” permissions can edit or delete them.
- Click Share.
- You will find links to shared directories on this page.
- Click Finish.
The file can now be accessed on another computer by opening Windows Explorer and selecting “Network” on the left pane. Highlight the file and log on with your credentials.
Here’s how to fix the problem of your PC not being able to see shared folders in Windows 10
The public folders should be visible on your PC if you have shared them correctly.
- You must have the same network connection between your PCs.
- All computers should be configured to use IPv6.
- All computers should be configured to allow network discovery.
- Check to see if all computers are sharing files and printers.
- Password-protected resources should be disabled and retested.
- When adding users to the shared folder, be sure to sign in with the account that you specified.
- Check that you are allowed to share files and printers if you are using Windows Defender Firewall.
Make sure that all network services are running and that they are set to Automatic. The following services should be running automatically:
- DNS client
- A host for the feature discovery providers
- The ability to discover and publish resources
- Providing homegroups
- Those who listen to the homegroup
- Group of peers
- SSDP Discovery
- A device that is UPnP enabled
Even though Windows 10 does not support Homegroup anymore, the feature is still included in the operating system. If you are unable to access shared folders on your Windows 10 computer, check its credentials.
- The Credit Manager, User Accounts, and Control Panel will appear.
- Add Windows Credentials by selecting “Windows Credentials”.
- The IP address and username and password of the administrator of the PC where the file is stored should be added.
- Save your changes by clicking OK.
Adding the IP address, username, and password will allow you to access the resource from other computers. You can type in 92.168.0.52Adminpassword, for example, in Explorer.
File Sharing Windows 10
Open the Network and Sharing Center under Start > Control Panel.
It’s possible to share files and folders across all of your devices in your home or office with a local area network. Even though it looks simple in concept, it can prove tricky to implement.
There is also a Troubleshooter for Shared Folders in Settings, Updates, and Security. Select Shared Folders, and run the troubleshooter.
These solutions should get you up and running again if your Windows 10 PC can’t see shared folders.
RECOMMENATION: Click here for help with Windows errors.
Frequently Asked Questions
Why can’t I see the shared folders on my network?
Make sure that network discovery is enabled on all computers. Make sure that file and printer sharing is enabled on all computers. Disable password-protected sharing and retest. Make sure that you are logged in with the same account that you specified when you added users to the shared folder.
Can’t access public folders in Windows 10?
- Check if you have a shared folder configuration on your PC.
- Turn on network discovery.
- Check the credentials of your PC.
- Turn on all network services.
- Run the troubleshooter for shared folders.
How do I view public folders in Windows 10?
On a Windows 10 computer, right-click the Start menu in the lower-left corner and select Computer Management from the drop-down menu. In the left column, go to System Tools -> Shared Folders -> Shared Folders to display a list of all shared folders in Windows 10 in the center column of the Computer Management window.
How do I fix a shared folder in Windows 10?
- Turn on file sharing and use it correctly.
- Disable password protection.
- Add a Windows account.
- Disable IPv6.
- Change connections for file sharing.
- Disable antivirus on your computer.
- Turn on support for SMB 1.0/CIFS file sharing.
- Update Windows to the latest version.

Mark Ginter is a tech blogger with a passion for all things gadgets and gizmos. A self-proclaimed "geek", Mark has been blogging about technology for over 15 years. His blog, techquack.com, covers a wide range of topics including new product releases, industry news, and tips and tricks for getting the most out of your devices. If you're looking for someone who can keep you up-to-date with all the latest tech news and developments, then be sure to follow him over at Microsoft.